How can you create a visual explanation of animals using NanoBanana in a way that helps students understand science and biology?
ShortSummaryIf you’re looking for a simple and effective way to explain animals to students in an engaging and easy-to-remember style, using a ready-made prompt on NanoBanana can give you very powerful results. The idea is to simply replace the animal’s name within the prompt, then click “Generate,” and a visually rich, well-organized, and clear scientific page will appear, helping students understand anatomy, habitat, life cycles, and adaptations in a fun and easy way.
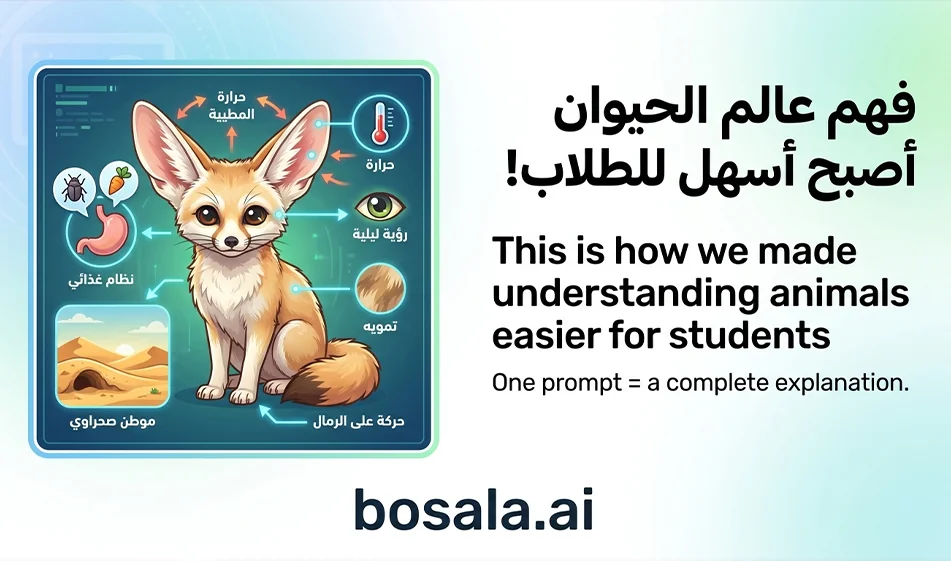
OverviewIn science and biology, many students struggle to memorize information when it is presented in a dry, traditional text format. But when information is transformed into a well-organized visual explanation, comprehension becomes faster, memorization easier, and focus higher. This iswhere NanoBananacomesin, especially when using a carefully designed prompt to generate an encyclopedic scientific infographic about animals. This method doesn’t just produce a pretty picture; it creates comprehensive educational content featuring images, headings, scientific classifications, and visual connections that allow students to understand the animal holistically at a glance.
What is the idea behind this method?
The idea is simply that you use a single, ready-made, professionally designed prompt, then just change the name of the animal you want to explain. NanoBanana thengenerates a detailed visual scientific design, featuring the animal in the center as the main element, surrounded by scientific modules that explain important aspects related to it, such as external anatomy, internal structure, habitat, behavior, life cycle, adaptations, and ecological role.
This means you don’t have to write a new description from scratch every time, nor do you need extensive experience in crafting prompts. All you have to do is choose the appropriate animal, enter its name in the designated field within the prompt, and then start generating. The result is often very similar to a modern encyclopedic science page, helping students see and understand the information quickly.
Why is this method useful for explaining animals?
The strength of this method lies in the fact that it transforms the explanation of an animal from mere scattered words into a cohesive visual structure. The student doesn’t just see the animal’s name; they see its shape, parts, habitat, distribution, and way of life—all within a single, organized design. This type of presentation prioritizes understanding over memorization and makes the information stick better in the memory.
Moreover, science and biology rely heavily on visual imagery, especially when discussing living organisms, internal organs, stages of growth, and differences between various environments. When an explanation is rich with images, symbols, and clear headings, students engage with it far more than they would with a long block of text. Therefore, this method is highly suitable for teachers, educational content creators, and parents who want to simplify science for their children.
What does this prompt produce within NanoBanana?
The attached prompt is designed to generate a comprehensive scientific encyclopedic infographic, not just a simple drawing. This means the expected output is a vertical page with a 9:16 aspect ratio, featuring the animal in the center, surrounded by a number of scientific units. Each unit is dedicated to a specific part of the explanation, such as:
External anatomy with close-ups of some detailed parts,
Life cycle and behavior,
Internal structure or internal organs,
Habitat and distribution map,
Special adaptations,
Evolution and relatives,
Ecological role,
Interaction with humans and conservation,
and Lifespan.
This makes the final output closer to a ready-made educational slide that can be used for explanations, presented to students, or published as part of visual educational content.
How do you use the prompt step by step?
The method of use is very simple, and this is one of the most important features of this idea. First, copy the entire prompt as is. Then, search within the prompt for the line containing the phrase with the name of the element you want to explain, and replace the existing text with the name of the animal you want to create an explanation for.
For example, if you want to explain the lion, replace the specified part with the word “lion.” And if you want to explain the elephant, the tiger, the penguin, or the dolphin, all you have to do is change the animal’s name. Then paste the prompt intoNanoBanana and click “Generate.”
After generation, the site will create a detailed visual design of the animal you selected. In many cases, you can regenerate if you want a better result, or improve the result by making a simple adjustment to the name or type of animal, or requesting a clearer version.
What should you change in the prompt?
The most important part to change is this line:
Specific topic:
🔴 Enter the item you want explained here 🔴
Here, you simply write the name of the animal you want, such as:
lion
giraffe
dolphin
owl
elephant
octopus
eagle
tiger
It is also best to keep the topic scope set to "Animals," since this use case is intended to explain animals to students. The rest of the prompt should remain as is, as it is carefully designed to maintain the quality, organization, and desired visual scientific style of the output.
Why is this prompt considered powerful?
This prompt is powerful for several reasons. First, because it does not simply ask the tool for a general image, but assigns it a very clear role: that of a scientific illustrator and encyclopedic infographic designer. Second, because it defines the working style visually and scientifically, preventing randomness and excessive ornamentation. Third, because it provides a ready-made scientific structure, ensuring the result is not scattered but organized and divided into clear units.
The prompt also emphasizes very important aspects of educational content, such as correct Arabic language usage, clear typography, accurate anatomical illustrations, and organized visual connections between sections. All these elements ensure the final product is truly suitable for students, rather than merely a pretty picture with no real educational value.
How does this approach help students understand and retain information?
When a student sees the animal at the center, with information appearing around it in the form of interconnected units, they build a comprehensive mental image of the subject. This is very important in education, because the mind remembers organized images faster than long texts. For example, when a student reviews the explanation of “the turtle,” they will not only remember its name, but also its shape, anatomy, habitat, adaptation, and role in the ecosystem, because all these elements appeared before them in a single visual diagram.
This makes this method useful for:
explaining lessons in the classroom,
preparing visual summaries before a test,
making the lesson engaging for children,
and facilitating the review of information in a faster and clearer way.
Who is this idea suitable for?
This idea is perfect for a wide range of people. It’s ideal for teachers who want to simplify their classroom explanations of animals. It’s also great for parents who want to teach their children science in a fun way at home. It is also suitable for educational content creators who produce posts, videos, or educational stories aimed at children. It is also useful for students themselves, especially those who prefer visual learning and want an easy way to memorize information.
The Best Way to Use the Output
After generating the design, you can use it in several ways. You can show it directly to students as a teaching aid. You can extract the key information from it and explain it verbally. It can also be used in an educational video, in an educational post on social media, or printed as a visual poster for the classroom.
When using this method, it’s best to focus on just one animal at a time, so the result remains clear and uncluttered. You can also create a complete educational series using the same method, dedicating a separate poster to each animal, such as a series on predators, marine animals, birds, or endangered animals.
Important Tips for the Best Results
To get a strong result, it’s important to choose the animal’s name carefully and leave the rest of the prompt as is as much as possible. It’s also best to regenerate the image more than once if the first result isn’t perfect. You can then choose the clearest version in terms of information organization, image quality, and text accuracy.
It’s also a good idea to review the text in the final output before showing it to students, as some tools may occasionally require re-generation to achieve a higher level of textual accuracy. However, in general, this prompt is designed in a very robust way that helps minimize errors and improve the visual and scientific structure of the resulting image.
The Ready-to-Use Prompt
Here is the prompt as is; you can copy and paste it into NanoBanana, changing only the animal’s name in the specified place:
Role: World-class scientific encyclopedic illustrator, scientific infographic designer, and visual knowledge map engineer.
Task: Create a comprehensive, highly accurate, and detailed illustrated scientific encyclopedic infographic, highly organized, visually stunning, in the style of a modern, high-end international scientific documentary magazine, with a professional editorial tone, very clear images and illustrations, clean and vibrant colors, and a modern, elegant, and easy-to-read Arabic font, without any logos or trademarks.
Subject area: Animals.
Specific topic:
🔴 Write here the element to be explained 🔴
General style:
A luxurious, encyclopedic scientific infographic design that combines precise scientific illustration with modern editorial layout, featuring a clean, light background or very soft beige, clear colors, excellent contrast, and highly professional visual organization. The work should look like a modern, distinctive scientific encyclopedia page, packed with information yet organized and easy to understand, with strong visual appeal.
Key Visual Requirements:
1. Central Element:
- The requested element must be the main subject in the center of the design.
- It must be rendered with a very high degree of realism and scientific accuracy.
-It must appear lifelike, with clear details, and a strong sense of depth and prominence.
- It should be surrounded by sufficient visual space to highlight it.
2. Overall Layout:
- A vertical design with a 9:16 aspect ratio.
- A highly professional, encyclopedic layout, clearly divided.
-Distribution of 6 to 9 organized content blocks around the central element.
- Each block is within a clearly defined frame or space, with a subheading and precise visual and textual content.
-White space must be carefully considered to give the design clarity and elegance.
3. Visual Style:
- A modern scientific documentary style.
- Clear, clean, and vibrant colors, not dull.
- Bright, high-resolution images and graphics.
-A blend of realistic scientific illustrations, detailed diagrams, anatomical sections, small maps, charts, and explanatory arrows.
- Thin, organized, and precise lines.
- The overall look should be sophisticated, editorial, visually appealing, and very clear.
4. Text and Captions:
- All text must be in Classical Arabic only.
- A large, clear main title bearing the name of the element to be explained.
- A modern Arabic font that is clear, elegant, easy to read, and professionally formatted.
-Clear subheadings for each unit.
- All referenced sections must be linked to precise and clear scientific arrows and annotations.
- Do not use decorative fonts that are difficult to read.
5. Visual Cohesion:
- Connect all units to the central element using a precise network of arrows, lines, dots, and visual relationships.
-Relationships must be clear, organized, and visually legible.
- Connections should not be random, but scientific and professional.
️ ⚠ Very strict requirements:
- It is strictly prohibited to draw any object or body outside the main subject unless it is absolutely necessary for direct scientific explanation.
-All anatomical drawings must be very clear and accurate.
- When explaining the digestive system or internal structure: a clear and direct scientific cross-section must be shown, not general or decorative drawings.
-Each scientific unit must be straightforward and clear, without distracting side examples.
- No logos, no trademarks, andnonon-scientific decorative elements.
- No visual clutter that hinders understanding, despite the density of information.
-The Arabic text must be 100% correct and completely clear.
Proposed module structure:
- Module 1: External anatomy with close-ups of fine details
- Module 2: Life cycle and behavior
- Module 3: Internal organs or internal structure (clear anatomical cross-section)
-Unit 4: Environment and Distribution Map
- Unit 5: Special Adaptations
- Unit 6: Evolution and Relatives
- Unit 7: Ecological Role
- Unit 8: Interaction with Humans and Conservation
- Unit 9: Lifespan
Final Composition:
- A scientific infographic that is dense with information, yet elegant and very well organized.
-The central element is prominently featured in the middle.
- All units are visually interconnected in a clear and professional manner.
- The final output must be of the highest quality, editorial, scientific, clear, modern, and suitable for publication as a high-end visual science magazine.
- Aspect ratio: 9:16
Quick example of how to edit
If you want to explain "the dolphin," instead of the phrase:
🔴 Write the element you want to explain here 🔴
Write:
dolphin
Then send the prompt as is. The result will be a detailed visual explanation of the dolphin, presenting its basic information in an easy, clear, and visually rich way.
Summary
Using NanoBanana with this prompt is an excellent way to turn animal explanations into visual content that is easy to understand and remember. The idea is simple: just change the animal’s name, then click “Generate” to get a detailed, organized, and engaging scientific infographic that helps students better understand science and biology.This method not only saves time but also helps make learning more fun, clear, and effective.